Monday, July 8, 2013

Hypertune and Rebuild of my CGEM DX


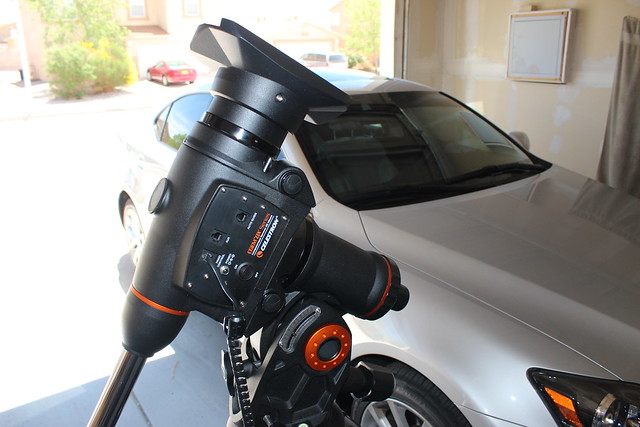
After my first light with the new gear I was bothered by some issues with the CGEM DX that I did not anticipate in a $2000 mount.  There was significant play in the Declination axis.  When the mount crossed the meridian the optical tube assembly would shift enough that the target object would be out of the field of view.  There was also some binding that I couldn't fully resolve with the adjustment screws.  The Right Ascension axis had slight stiction as well.  While autoguiding, the mount had significant, yet random deviation in Declination.  Oddly the autoguiding was relatively smooth in Right Ascension after the initial few corrections (settling).  I spent hours tinkering with mount settings, balancing, and autoguiding parameters to determine the issues were indeed internal and would have to be resolved somehow.

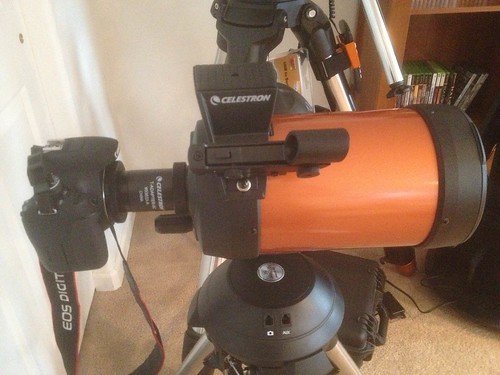
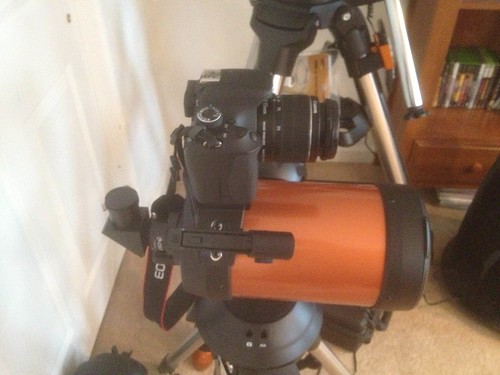
After much discussion with some experienced peers, and a conversation with Ed from www.deepspaceproducts.com/ I decided against sending the mount to Celestron support and would rebuild it myself.  What pushed me this route was the fact that this mount had already once been sent to Celestron for troubleshooting.  It can take a significant amount of turnaround time (upwards of months based on feedback from several people who have gone the support route.)  At the end, it's possible that an entirely different mount could be shipped to me, with entirely different issues, possibly the notorious "cogging" issue.  My poking around and prior Celestron mount rebuild experience led me to believe my main issue was play in the Declination worm gear assembly - so I thought...  Watch the following time lapse, and in the second segment of the video I have still shots that show a number of key issues I encountered.

CLICK HERE for Time Lapse Video of CGEM DX Hypertune and Rebuild

Also view the following gallery for high res pictures I took during the tear down process. (The time lapse is more to show the level of involvement in a full rebuild.  It took me over 5 hours, including two trips to the hardware store.  You'll probably get more meaningful content from the second segment of the video, and the photo gallery.)

CLICK HERE for Flickr Gallery of close up component pictures

So I bought a Hypertune package from Ed.  And had to run to Ace Hardware for a few extra tools I didn't have on me.  Here's a list of what I used:

  • Allen Keys/Wrenches - Metric
  • Analog Caliper
  • Strap wrench
  • Channel Locks
  • Needle Nose Pliers
  • Variable screwdriver set
  • Exacto Knife
  • Dulled Knife
  • Thread Lock
  • Super Lube
  • Metal Polish
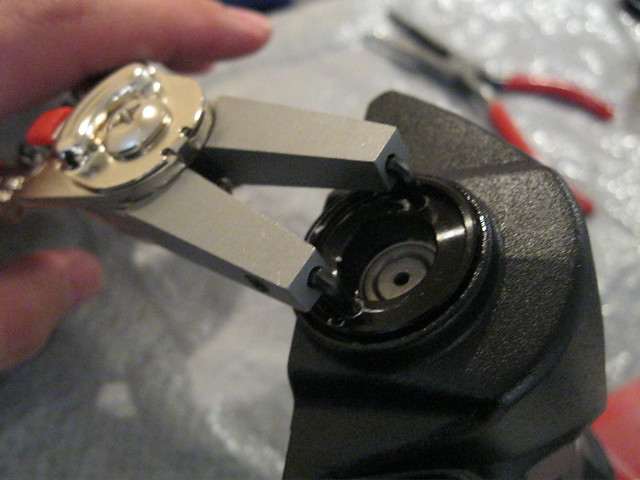
  • Custom worm retainer ring removal tool
  • Hard bristle brush
  • Rubber Mallet
  • WD-40
  • Sand Paper, 300, 400, 800, 1000 grit
  • Paper Towels
  • Pen and Paper
  • Painters tape roll (set the mount assembly on it, worked great)
  • Teflon spacer rings
  • Isopropyl Alcohol
  • Caffeine (in regular intervals)

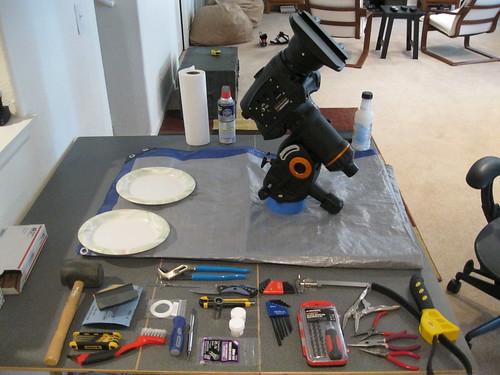
Disassembly is only recommended for those who are technically inclined. 

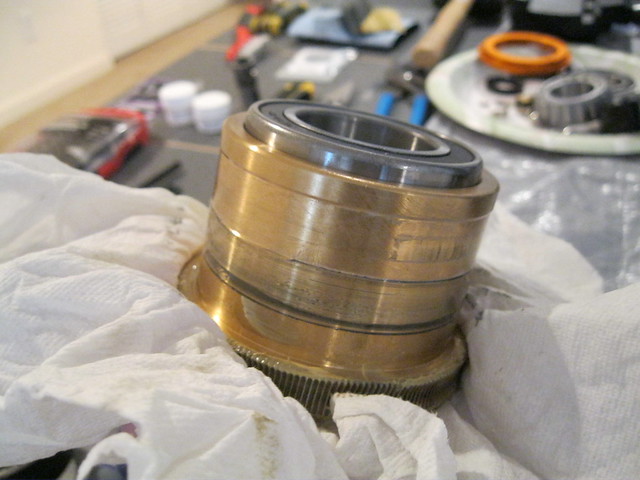
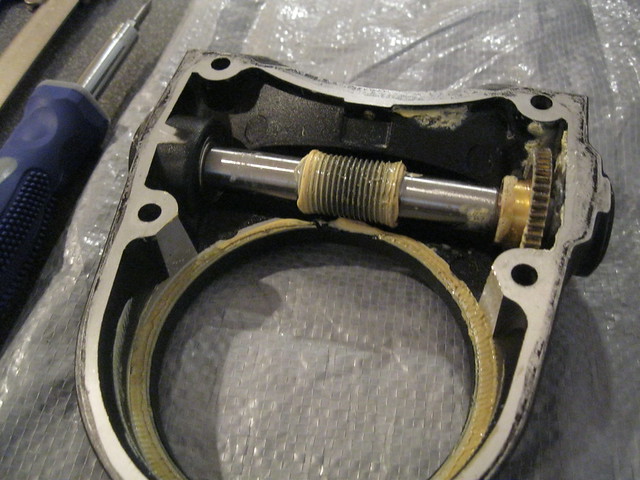
So I removed the Saddle first, and saw scoring on the top retainer ring for the Declination assembly - my first clue this thing was carelessly serviced.  Then I took out the "external items" such as clutch and assembly, polar scope covers, the polar scope, etc.  I removed the bottom Dec retainer ring assembly and found one cross-threaded hex screw in there.  I hit it with WD-40, but it was fairly ruined.  I removed the other screws and hit it with a strap wrench, then removed the hex screw after.  After that the taper bearing pack has to come out, then slide out the entire axis.  It was in there solid.  I could feel some friction points as I lifted it out.  Removing the bearings, spacers, and ring gear assembly was straight forward, except the bottom spacer - it was a PITA.  There was obvious scoring and pitting on the ring gear.


 So the Worm gear assembly was fairly disturbing.  First they were seriously drowned in some yellow grease which was far too heavy and thick to be truly useful.  This was a common theme through the whole process - too much grease.  It was in the housing, and on every part.  The next issue on both DEC and RA worm assemblies was the fact that they GLUED the locking/retainer rings in on one side.  The rings showed scratches and scoring from careless hands and slipped tools.  The retainers were so tight that neither gear spun freely.  It took effort to spin them.  I broke a brand new spanner tool in an attempt to remove one.  Finally I resorted to cooking the assembly in the oven to break up the glue.  Yes - I put them in the oven.  Somewhere I doubt any other telescope mount has been - an oven.  Some pics below.  See the gallery link above for more, detailed images.


RA axis disassembly was straightforward.  Comperable to Dec, just slightly different shaped parts.  More pics in the gallery link above. 

Getting down to it - the biggest problems I found in the mount -

  • Burrs and rough spots in the housing, contacting moving parts
  • Terrible factory lubricant, and too much of it on everything
  • Worm gear retainers were too tight to allow proper spin
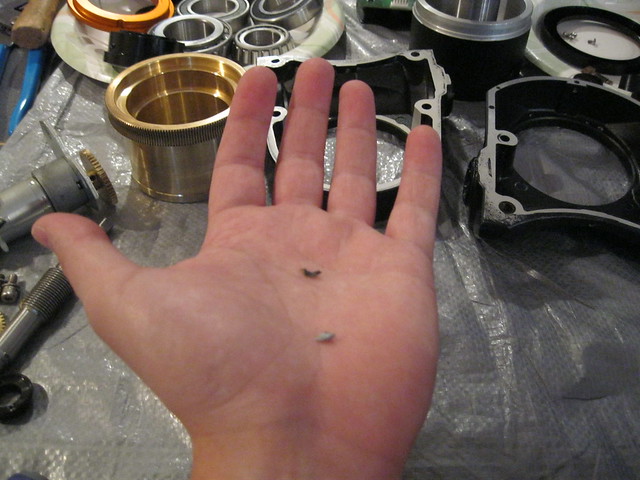
  • Retainer ring screws were cross-threaded and scraped from tools
  • Worm retainer rings were GLUED into threads
  • Scoring found on the Declination ring gear
  • Backlash screws in DEC were cross-threaded and had to be reworked.
  • Spacers were low-grade, hard plastic, and spacing was poorly implemented
  • Motor spur gears were not meshed properly


More images in Flickr Gallery

Now on the plus side of things, all of the bearing packs were in good shape.  They were even better after I cleaned them and used Super Lube to replace the factory gunk.  I sanded down both ring gears to remove the scoring and rough spots.  Worm components were polished up.  Spacing was corrected with Teflon spacers, and retainer/locker rings were PROPERLY tightened to prevent play, while allowing components to spin smoothly.  Thread lock was used in appropriate places.  Getting the bearing packs back into the assembly was a challenge without binding components, but Super Lube, and gentle, tactical taps from a rubber mallet helped quite a bit.

When mechanical assembly was completed, it was time to adjust gears, backlash screws, and motor positions.  This can be done almost entirely by feel and sound.  The DX has peep hole screws on the bare side of the housing.  When the gears were too tightly meshed, rotation was sluggish and the motors whined as if they were over-tasked.  Too loose and they spun fine, but with backlash and play.  It took about three passes to get the motors just perfect.  For the backlash screws, start with the "top/front" screw for each axis.  Thread it back in while slewing the appropriate axis.  You can hear the pitch of the motor change once you've reached the right position.  Hard to describe, but you know when you get it right.  Too much and the motor pitch changes again back to that overloaded sound.  Back it off just a hair and it's perfect.  The task is easier on the "bottom/back" backlash screws - simply thread them in until the motor changes pitch, then back off just slightly.

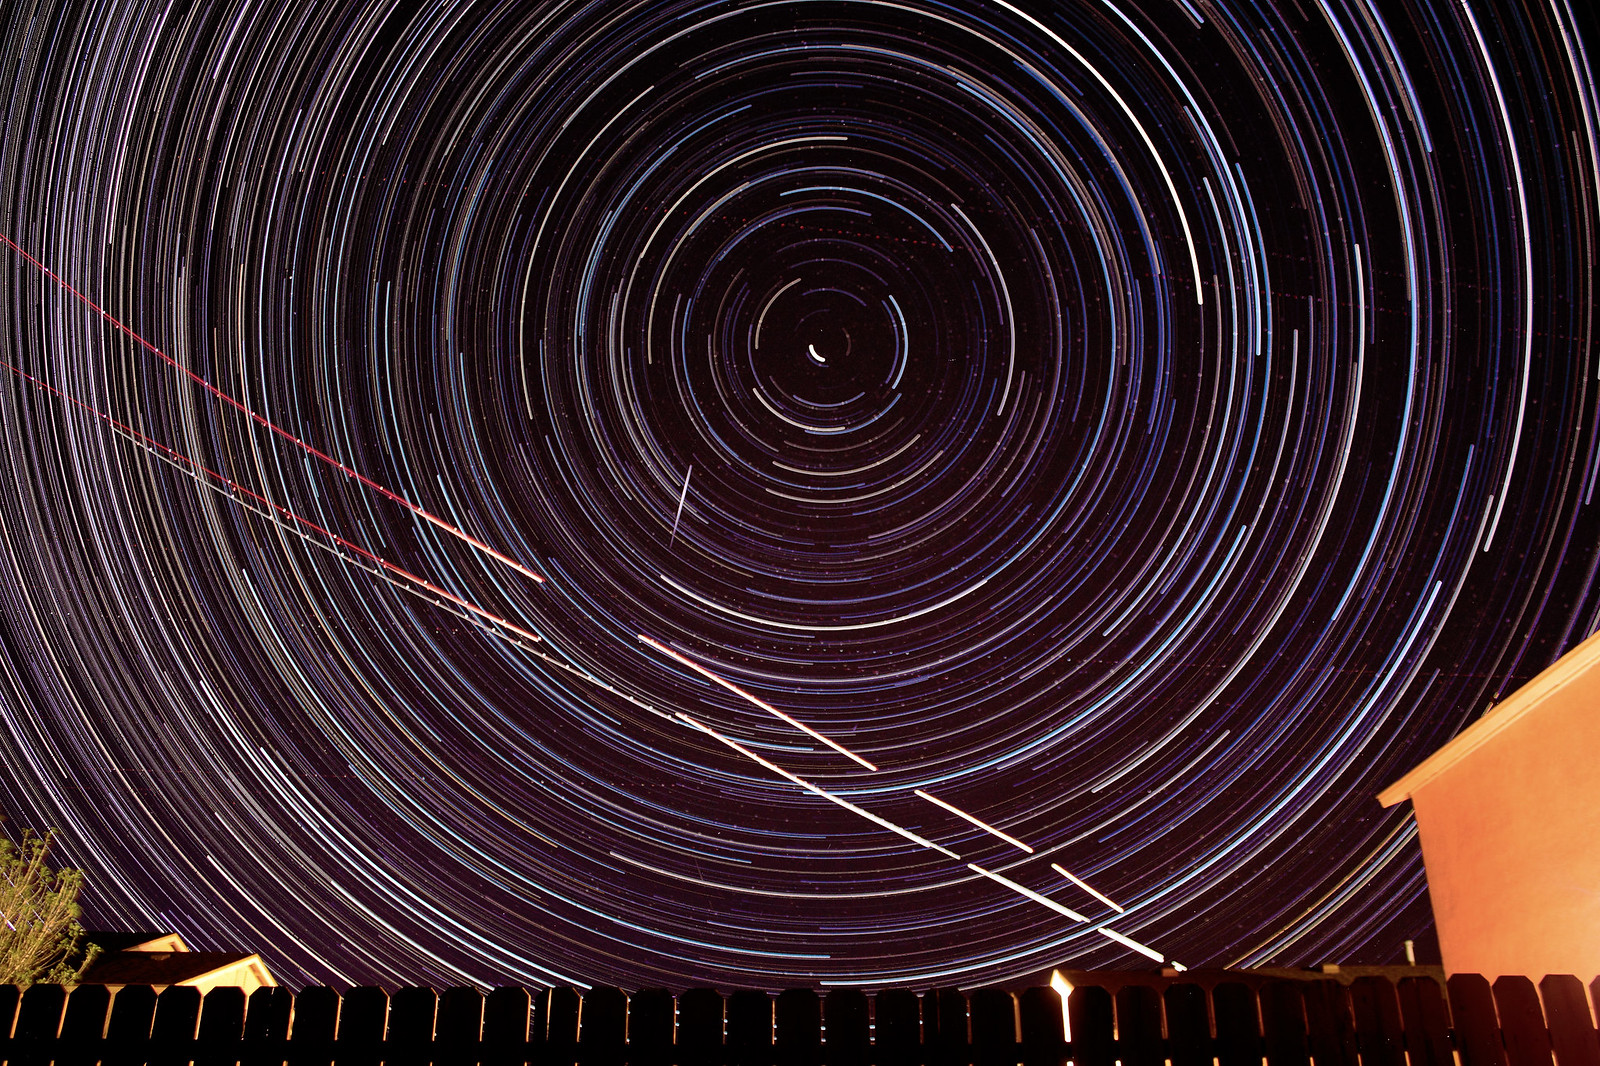
After I finished, the mount was much more quiet, the motors didn't sound like they were fighting anything.  I have no play in Declination, yet it spins smoothly when unclutched.  RA has no stiction anymore, and spins so smoothly, it felt like it was a high precision bearing by itself.  No binding is present.  I have zero doubt I fixed everything in this mount, AND improved on the performance overall.  I'm hoping for a clear night this week to put it in the field and test to confirm.  Autoguiding tells all.  Before the tune, it would deviate and skip in DEC randomly, and you could see the guide star move off position by 5-10 pixels.  At 1300 or 2000mm focal length, this leaves double dotted stars in your exposure.  I believe this was party due to burrs pressing against the DEC ring gear, but also the slop and play as well. 

Please feel free to ping me with questions or clarification on anything.  I can also be found on Cloudy Nights - DaemonGPF.  Hopefully this write up helps someone out.

Monday, June 24, 2013

Thunderstorm Time Lapse Video


Click hyperlink above photo to go to Time Lapse.
I recommend turning off scaling, and turning on HD for best viewing.  It looked grainy on my laptop but great on my 24" desktop LCD.

I'd like to present a timelapse I shot from 12pm through 12am yesterday of a massive thunderstorm system that built up from the Front Range in Colorado, and moved over Aurora, and then eastward.  I shot part of it in Infrared. 
Video starts out facing West towards the Front Range, then East, as it progressed over Buckley AFB and Denver International Airport. 
I hope you enjoy.  It was one heck of a show for us as this storm dropped 400 bolts an hour within our view.

Friday, June 21, 2013

First Light with the Nexstar 5SE

Aurora got her chance for first light with her Nexstar 5SE this evening shortly after sunset, albeit, a very brief one.  There are several new fires burning to supplement the other big fires that have been going for a while now.  While there are no "clouds" per se, the smoke and ash is blotting out the sky each night.  The very orange looking moon broke through for about a half hour and was gone again.  No stars to be found.

Regardless, Aurora sat down and drove her Nexstar from the laptop, controlling alignment, tracking, everything.  Because of the bad conditions she couldn't get a sharp shot natively, so an F/6.3 reducer was put in front of the T3i and t-adapter.  She set the camera for low ISO and full video mode and let it rip in bursts of 1500 frames.  A few neighbors walked by to see the spectacle and ask what the heck we were doing.  They were astounded to see the moon live, and full resolution on the laptop screen.  The clouds rolled in shortly after, and we packed it up.


We're still waiting on a clear night to actually set her scope up on the equatorial wedge and properly align it for some more serious work.  Our set of ASI120MM and MC planetary cameras haven't arrived yet either.  And my deep sky gear - well, it's so heavy that I'm not going to even bother dragging it out for a sucker hole in the smoke and clouds.  It may be a while before I see first light with the heavy rig.

Tuesday, June 18, 2013

Mixed results today

Today I received almost all of the remaining components to assemble my replacement imaging rig.  I also upgraded my daughter, Aurora to a new Nexstar 5SE scope (pictures below).  However, that's about where the positive news ended.  The gear arrived just before Tornado sirens started sounding in our neighborhood.  The Air Force base to the north also started to sound off.  We had a tornado touch down just north of us and we rushed to the basement for shelter.  In the process of dragging emergency supplies down the stairs, I fell and rolled my ankle, hard.  Nothing broken that I can tell, but it's swollen, and certain I sprained it at minimum.  Urgent Care in the morning just to confirm.  That's not the worst of it.  It seems the CGEM DX mount has a bad DEC axis motor, or is binding for unknown reasons.  I didn't notice this when testing it out in New Mexico before moving so it's highly likely this was messed up in the moving process.  I haven't been able to fire up the mount until tonight to identify this new development.


So while we sat in the basement we set up the Nexstar 5SE.  It worked flawlessly.  We even set it up to drive through stellar cartography applications on the laptop.  I bought a DSLR piggyback adapter to run the DSLR with lenses on top of the OTA for widefield imaging.  I also bought a t-adapter and t-ring to use the DSLR prime through the scope.  Picked up a serial to USB converter, a nice barlow, and waiting on an ASI120MC planetary camera to arrive hopefully next week.  Also snagged some 13% neutral density lunar filters, and a 2.5A power brick.  The 5SE has a built in equatorial wedge, so it can be configured for some basic deep sky astrophotography, or widefield piggyback imaging.  Aurora is mostly interested in lunar/planetary observation and imaging right now so this seemed like the perfect setup with room for her to grow.  She can break it down into 3 small pieces to move it around.  Her current dobsonian is bigger than she is and weighs as much so she can't manage it on her own, nor does it track.   This is a major upgrade for her.

On my setup I picked up an 80mm/600mm focal length guide scope, mounting rings, brackets, and extension tube.  Bought myself an ASI120MC camera as well to serve dual functions as my autoguider and occasional planetary cam.  Also grabbed a 5A power brick for the CGEM DX, and a serial to USB converter.  Since we're now in light pollution at our new home, I picked up a Hutech IDAS LPS-2 filter to use with my QHY-8 OSC CCD camera.  I'm waiting on my ASI autoguider, my F/6.3 focal reducer, and a new camera nose for the QHY-8 to use the filter on the camera, and for prime imaging.  However, I now have to sort out the CGEM DX problem which has rendered all of this useless and pointless for the time being.  Some phone calls are in order tomorrow.  I'm dead in the water until the mount is operational.


Tuesday, May 28, 2013

New Mount, New Optics

Despite the fact I'm literally moving in 1 day from now, I couldn't help but start to build my new AP rig.  I managed to get a new mount and optical tube assembly to manifest right at the 11th hour.  I snagged a CGEM DX mount and a C8 Carbon Fiber OTA with extras.  Here's a few pics:


For those of you who don't know what a CGEM DX is, it is a substantially enhanced CGEM mount which is a fantastic performer as well.  The DX has the CGE Pro tripod which is made of 3" steel legs and weighs quite a bit.  It's very stable.  The motor head has regulated power and electronics enhancements as well as beefed up mechanical components.  The counterweight shaft diameter is larger to handle the numerous 22 lb counterweights it is designed to carry.  It's rated capacity increase is about 10 lbs over the regular CGEM but in reality, many astrophotographers are loading these things similar to the old CGE mount which was more than capable of carrying a C14 OTA for imaging purposes.  With a Hypertune rebuild kit this mount would absolutely support a C14 for imaging purposes without any complaint.  It may be tricky to dial in a C14 on a stock DX, but a C11 is an ideal capacity load which is not all that much of a compromise anyway.
 
The C8 is Carbon Fiber, meaning, no focus shift due to thermal variance at night as with the Aluminum and Steel OTAs.  This is ideal for my environments where I live at ultra-high elevation, in low humidity, that experience extreme temperature swings during parts of the year.  With little atmosphere and little cloud cover, my locations that can swing 40-50 degrees F in a single night session.  In other words if I set this up and pull the trigger I can go in and go to bed for the night without having to constantly redial the focus as many do.  This particular one is FASTAR enabled, giving me the ability to bolt on a Hyperstar unit which will give it a flat plane and F/2.0 focal ratio.  I have used this exact OTA before for this purpose and there are no words to explain just how devastating such an instrument can be in the right hands.  My image gallery shows my Hyperstar images through a similar configuration a few years ago.  Photon collection at the sensor is so quick that you can indeed shoot with an Altitude-Azimuth mount without any guiding.  This OTA is one of the most versatile instruments since it can be reconfigured for 400mm, 800mm, 1200mm, 2000mm, 4000mm imaging in just a matter of moments.  Great for wide field deep sky imaging, high resolution imaging, and lunar/solar/planetary imaging, it's hard to beat this with any single scope out there except for its siblings - the C6, C9.25, C11 which give comparable performance specs, trade-offs being weight vs. aperture in both directions.

Thursday, May 23, 2013

QHY + SBIG + Olympus = A cool toy (Pun Intended)

Traded out recently for some toys.  I missed my old QHY-8 OSC CCD, so now I have another one.  What's as good as a DSLR for wide field, but also as good as a CCD for sensitivity with thermoelectric cooling and low noise?  A CCD that can use SLR lenses.  So if you take a QHY-8 for example, go get a bayonet adapter from SBIG, and some SLR lenses, and slap this hodgepodge together, you get exactly that - a super sensitive, low noise, wide field imager.


Here's a test shot indoors during the early morning hours while it was still dark out.  1 second on a DVD shelf across the room.  Looks like it reaches focus just fine. 

 
Next Step - mounting hardware to piggyback it on my new CGEM DX EQ mount or on top of whatever OTA I end up picking up here shortly.  For now it's all back in the box for the big move coming in the next few days.

Monday, April 29, 2013

Moving from NM to CO - Time to Change Gear

I am finally relocating with my job from Rio Rancho, NM to Colorado.  Here's a picture from where we'll be residing shortly - you can see the moon setting behind Pikes Peak.


It's such a pretty part of the country throughout the entire area.  However, despite how calm and quiet it appears to be, the span from Colorado Springs to Denver and surrounding areas happens to carry a massive light dome, as you can see from the next image..

 
We're leasing a place for the first 12 months while we look around further.  However, we're hoping to aim for the yellow/green zoned areas between Colorado Springs and Denver, i.e. something around Castle Rock or Larkspur, etc.  Unfortunately this area is growing fast and it's likely to change shades soon. 
 
I have been waiting for a while now to replace my main imaging gear as we were uncertain if we were actually going to relocate, and where specifically that would be.  Now that I know the details, I'm going to have to change my imaging gear from OSC (One Shot Color) imaging that I've done for the last 7 years to narrowband imaging.  This requires completely different processing techniques and camera gear to be effective in this much light pollution, which of course affects choices on optics to match it. 
 
I'll post details on the new setup once I've settled on the solution I want to build.  The big move is in 4 weeks.

Tuesday, April 16, 2013

Polaris star trails

It sure is busy around here occasionally on weekday evenings..  Sometimes the wind direction can cause the approach path for commercial airliners heading to Albuquerque to shift over my backyard.  This becomes fairly apparent when shooting a time lapse.  I stacked a segment of the shots to show all of the activity.  You can see a few aircraft streaks, a couple of meteors, and plenty of satellite trails.  Some of this data will be compiled into another time lapse project I'm working on currently.  More to come.


Tuesday, April 9, 2013

Timelapse from White Sands Star Party 2013

https://vimeo.com/63616860 

A timelapse from the White Sands Star Party April 6-7, 2013.  Some of the lapse sequences were shot from west of Albuquerque, and also from Rio Rancho, NM.  To download the sequence go to this link:

https://vimeo.com/63616860/download?t=1365519603&v=156789221&s=890f25da5455fc627e8f2633c3405bae

Here are a few images from the trip on my flickr gallery.  More to come.

http://flic.kr/s/aHsjEDNXXw

Sunday, March 24, 2013

Workflow Video 2

I just finished my second video clip, showing more intermediate processing techniques that I use.  This time the target was Orion, dealing with a very high dynamic range and how I preserve the core from becoming blown out while getting the most extreme faint dust lanes to pop out.  I also show a couple of tricks on how I subdue gradients and noise that begins to manifest after so much data stretching, but preserving star sharpness and extended object sharpness at the same time. 

AP Workflow Video 2 - Orion

For those who missed it, here's my first workflow video, showing more fundamental processing steps that I use on a majority of my deep sky images.  I recommend starting with this one.

AP Workflow Video 2 - North America Nebula

Tuesday, March 12, 2013

Comet Panstarrs and Crescent Moon

My daughter Aurora and I set out tonight to view Panstarrs and the new Crescent.  We walked out behind our house which is relatively remote, just northwest of Rio Rancho, NM, giving us dark skies and a wide open field of view.

We set up the cameras just before sunset and waited.  It was probably 20-25 minutes after sunset before we had our first glimpse of the new moon (which was only about 28 hours old in this cycle) and Panstarrs.  The atmosphere was so stable and clear that we were easily able to see the tail prominently without visual aid.  Here are a few images we captured tonight.


Saturday, March 2, 2013

Workflow Video 1

I recorded my post-processing workflow on the North America Nebula and annotated the steps.  This is mostly basic processing techniques that I use almost ubiquitously  across many of my Astrophotos.  Sorry about the compression.  It makes the initial portion of the video appear a bit grainy, but it is still very clear what is going on, and you'll begin to see the image build into the final product.  I'm also including the exact same raw stack of data below, open for anyone to use to test this workflow on.  I'll record a few more advanced post-processing videos of more difficult objects - i.e. Orion - as soon as I have a little spare time.

Workflow Video 1 - North America Nebula

Download raw FITS file, pre-calibrated, unprocessed